Grid Pro Quo with Tik Maynard

Ready to spice up your arena routine this winter training season? In this series, we are revisiting some of our favorite Grid Pro Quo articles from Eventing USA to help you use the off-season to your advantage and keep you and your horse in tip-top shape for when it's time to get back out there. Click here to check out other past Grid Pro Quo exercises!
WHY:
While on paper you may think that this exercise is overly simple, I find that it is the perfect thing to work on during the winter months to help prepare for the upcoming show season. I’m a big believer in training my horses – and students – in a systematic manner. And this is a great exercise to set up on your own and practice in between lessons. Even better, get a group of friends together and make a game of it.
I developed this exercise to help teach my horses and students adjustability and rideability. As eventers, we need to know what stride length our horse is on at any given time so that when we’re at a show we’re able to adjust to any stride length that the course designer is asking for. Being able to practice smoothly and quickly changing stride length throughout this exercise will help you at shows because your horse will be more adjustable and more rideable. And as a rider you will have the confidence to know that your horse is capable of any adjustability question you may face.
The great thing about this exercise is that you can set it up anywhere. If you’re lucky to live in a warm climate during the winter months, you can set it up in a field and use the terrain to add a little difficulty to the exercise. But I suggest starting out with setting this up in your arena. As you get comfortable with this exercise you can even set it up using a bank, cross-country jump, or a show jumping fence as one of your poles. There are an infinite number of ways to make this exercise easier or harder.
As you work through this exercise, I encourage you to challenge yourself, but never be afraid to back up a step if needed!
HOW:

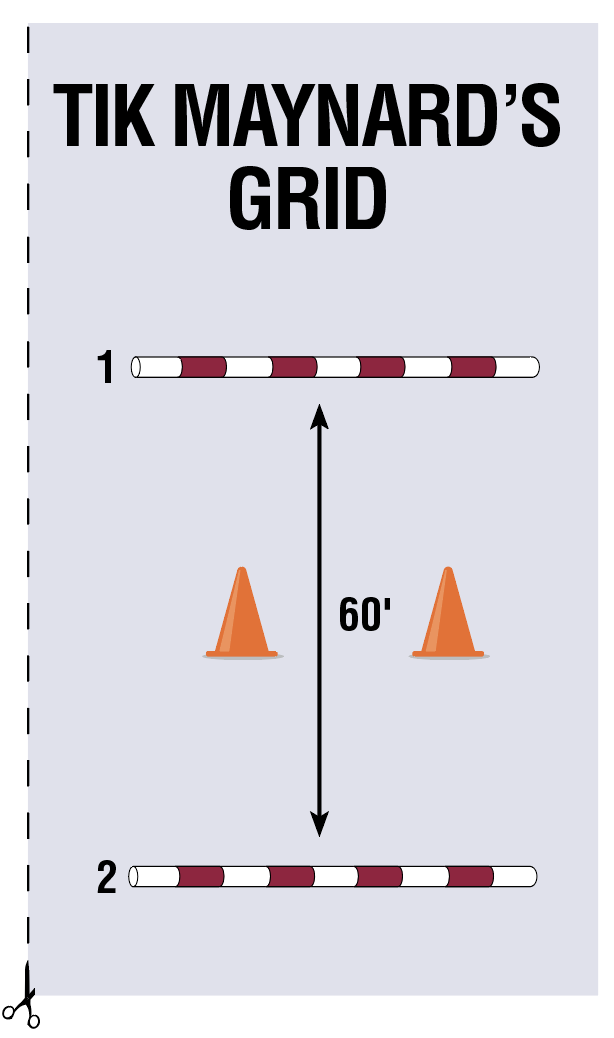
As mentioned earlier, I try to take a very systematic approach when teaching my students about eventing, and I believe that it starts on the ground. So before you even get your horse from the field, head out to your arena to set up your two ground poles. If you’re inexperienced with setting fences, this is a great way to start. The first step is to measure out 60 feet with your tape measure and then walk it out. It should be 20 of your 3-foot steps, and if it’s not, simply keep practicing it until it walks easily for you. The vast majority of show jumping courses are based on a 12-foot stride. So this 60-foot exercise works out to four strides, with the extra 12 feet being for landing and take off.
This particular exercise has 15 steps. As you work through the steps, if you run into a problem with any of these steps, back up a step. Don’t simply keep trying at the current step. It’s much more productive to take a step back, re-master that, and then proceed forward again.
As you work through the exercise keep the following three priorities in mind:
- Is your horse safe at the end?
- Are you safe at the end?
- Is your horse more relaxed at the end than at the beginning? Because remember that your horse needs a certain level of relaxation in order to learn.
So let’s get started!
- Lead your horse in-hand over the poles:
You should be able to do this on a “loose rein” meaning they should calmly walk next to you back and forth over the ground poles a few times. - Walk over the poles mounted on a long rein:
Again, your horse should be able to walk calmly over the poles. No stress. Even from the beginning, you want to make sure that you’re going over the center of each pole, which is why we have the cones in the center to help test your straightness. - Walk 1, Trot 2:
Regardless of the level of connection you have in the bridle – which should coincide with your level of training – you should simply pick up a quiet trot after walking over the first pole. - Trot 1, Walk 2:
This is where some people can get caught up. Sixty feet is a long time to make a good downward transition, so don’t rush it. - Trot both poles:
Again, regardless of the level of connection you have in the bridle, just trot through the poles with your goal being to keep a quiet, consistent rhythm throughout. - Trot 1, Canter 2:
This is a great way to practice your upward canter transitions by asking for the transition over the first pole, or do the transition halfway between the two poles. - Canter 1, Trot 2:
Just like your trot to walk transitions, remember that you have plenty of time to make a transition. - Canter both poles:
Whether you’re in a half seat or full seat, your only goal here is to confidently canter over both poles. If you have trouble keeping your canter lead over both poles, try to think about going over the poles in an oval shape, rather than a square. - Canter both poles and count your strides:
This is where it comes in handy to do this exercise with friends as you can help each other count strides. - Consistently get 5 strides:
Challenge yourself to get 5 even, 10-foot strides between the two poles. The extra 10 feet is for take-off and landing. - Alternate between 5 and 6 strides, 4 times in a row:
The key to being able to alternate between two stride lengths is planning. You will quickly learn that you cannot solely rely on your reins to make these adjustments. Use your seat and leg to also help you adjust your stride, think about changing the balance before you change the speed. - Get the following pattern—5, 6, 7, 6, 5 strides:
The challenge here is to keep compressing your horse’s stride and then immediately lengthen it back up. - Get the following pattern—4, 5, 6, 7, 6, 5, 4:
This is just a repeat of the previous exercise, but a slightly bigger challenge. - Get the following pattern – 4, 7, 4, 7:
While the previous two were gradual transitions between stride length, this is more of a challenge to immediately change from four to seven strides. - Get creative! Set up the exercise in the center of your arena and try alternating directions each time with a flying change over the second pole. Make the exercise even harder by adding more strides or make them into jumps. Or set this up outside and use terrain. Or try this using skinny rails.
I like to use these steps as one gauge for when my horses and students are ready for a certain level. I tend to require my students to be able to get through Step #10 before going Beginner Novice, Step #11 for Novice, Step #12 for Training, Step #13 for Preliminary, and Step #14 for Intermediate.
I cannot stress enough that if your horse is having any trouble to take a step back until they can do the previous step in a relaxed manner. I’m looking for the horse’s mouth to be closed, their tail to be quiet, and able to keep a rhythm.
If your horse is having trouble relaxing with you on their back, then work them in hand over the poles until they are ready to try again with you mounted. If your horse is getting anxious when you try to get them on the bit, go back to riding on a relaxed rein. I don’t even begin to ask a horse to jump until they can walk, trot, and canter around – both in an arena and outside – on a relaxed rein.
Finally, spend some time watching your horse’s ears while you’re riding. They should be fairly relaxed and even flopping while you’re hacking and flatting. And when you start jumping, their eyes and ears should look to the jump. Your horse should briefly check in with their rider in the turn before the jump, and then think ahead to the jump in front of them. Your challenge as a rider is to see if you can communicate with your horse without interfering with their job. And the best way to do this is practice, practice, practice over these ground poles.
About Tik Maynard
A lifelong horseman, Tik Maynard is based in Citra, Florida with his wife, fellow eventer Sinead Halpin, at their Copperline Farm. His business combines eventing and natural horsemanship, with students of every level and discipline. He recently published his first book, "In the Middle Are the Horsemen." To learn more about Maynard, visit www.tikmaynard.com.


